Explore how you can add powerful dynamic actions through native push notifications, transforming your Mendix app into a seamless and interactive experience for users.
Open your NativePushNotification app in MX Studio Pro,
Go to Home_Native page & Open NativeHomepage_Snippet.
Double click on Notifications widget -> Click on Actions -> Create new action & give the your action name(show_page). In OnOpen select show a page & Create new blank native page (Notified_Page).
Open your Notified_Page & Add some static data or do what you want.
Go to NativeHomepage_Snippet again -> Open your action -> Select OnReceive & select call a nanoflow -> Create a new nanoflow(ACT_OnReceive).
Open your ACT_OnReceive nanoflow -> Drag & Drop Show message activity & write some message ‘Application is already open’.
Go to your IVK_SendMessagesToDevicesmicroflow -> Double click on Send message Java Action & In the context object select $MessageData.
Now save this and publish the application first & then make your APK.
After installing your APK successfully in your physical device, Open your mendix publish environment app -> Go to Administration page,
Then go to devices tab, You will see one popup menu if you click on this you will see there will be one button Send Message. Sometimes this pop up menu does not work i am not sure why if this is not working just take another button and call that microflow(IVK open send message form) & publish again.
Now click on that button & send the message what you want & in the action name type the exact same name which you gave in the Notifications widget(show_page).
After receiving the notification, click on it to trigger a dynamic action.
Conclusion:
I hope this article has helped you understand How To Implement Dynamic Actions with Native Push Notifications in Mendix.
Thanks for reading this! See you in the next blog post.
In this guide, learn how to integrate native push notifications in Mendix Native apps using Firebase. Discover how to configure Firebase, set up notifications, and keep users engaged with real-time updates.
2. Open the newly Created Project, Click the Project Overview cogwheel and select Project settings.
3. Go to the General tab and scroll down & click Add app and select your target platform Android & give the any name in the Your apps section.
Copy this Android Package Name & save it somewhere secure.
Download google-services.json & save it somewhere secure.
4. Go to the Service accounts tab, On this page, press Generate new private key. Store the resulting file in a secure location. You will use this file when configuring FCM in the back-end of your Mendix application.
Configure Push Notifications: —
Go to your MX Studio Pro & Search NativeHomepage_Snippet and Drag & Drop this snippet inside Home_Native page.
Go to Navigation -> Click the Native mobile (tablet & phone) navigation tab -> Click the Synchronization configuration button & From the Download dropdown menu, select All Objects for DeviceRegistration entity from the PushNotifications module and click OK.
Go to https://passwordsgenerator.net/ this website, generate 32-character key length, In the MX Studio Pro search EncryptionKey & paste this 32-character key here.
Here you have to remember somethings 1) You have to publish your application first before making the APK.
2) When you are making an APK you have to keep same package name which you copied from firebase console.
3) Select App Capabilities -> Firebase Configuration -> On PushNotification & Upload google-services.json file which you downloaded from firebase console.
Testing the notifications:-
Now run the application in publish environment & open in the browser.
1.Click on Administration Page on the server, The first time you open this page it will present you with a wizard to set up the Firebase configuration.
2.Check for the Android in this case. If you want, you can do it for Web and iOS too.
3.Go to the Firebase Project, In the General tab, Copy the Project ID & Paste here.
4.Upload the Previously downloaded private key file, your file name will be “ProjectID-firebase-adminsdk-identifier.json”.
5. After successful installing your APK in your physical device -> Open your mendix publish environment app -> Go to Administration page -> Then go to devices tab, You will see your device is registered.
Now test the notification.
Open your mendix publish environment app -> Go to Administration page, Then go to devices tab, You will see one popup menu if you click on this you will see there will be one button Send Message. Sometimes this pop up menu does not work i am not sure why if this is not working just take another button and call that microflow(IVK open send message form) & publish again.
Now click on that button & send the message what you want.
Conclusion:
I hope this article has helped you understand How To Implement Native Push Notification In Android Application With Firebase
Thanks for reading this! See you in the next blog post.
Turning Your Mendix App into a Mobile Experience: A Comprehensive Guide to Building an APK.
In this guide, I will walk you through the process of creating an APK file for your Mendix application. This will enable you to run your Mendix app on Android devices, providing a seamless mobile experience for your users.
Create an empty folder on DESKTOP and give the folder a name like MENDIX.
11 steps to make an APK using Mendix
1.In Mendix Studio Pro, click on App -> Build Native Mobile App.
2.Next, select “Build app for local development” or “Build app for distribution” according to your requirements. Here, I am using “Build app for local development”.
3.Give your app a name & click Next step.
4.Select the previously created empty folder (MENDIX) & click next step.
5.If you want to change your app icons, you can do so (I am keeping my Default options until Step 7)& clicknext step.
6.If you want to add a custom splash screen, you can do so & click next step.
7.If you want to add any custom fonts, you can do so & click next step.
>After successfully building the APK, click on locate, analyze, and then the debug folder. Here, you will find your APK, which you can share with anyone.
OUTPUT
Conclusion:
I hope this article has helped you understand how to build an APK using Mendix.
Thanks for reading this! See you in the next blog post.
Stay connected with your application, even offline! This post covers how to set up scheduled local notifications in Mendix Native apps, providing timely reminders and updates directly on your devices without the need for an internet connection.
1.Open your ACT_SendNotification nanoflow -> Replace your Display Notification activity with Schedule Notification activity.
2. Double click on Schedule Notification activity & Configure the values.
i) Date :- EndOfCurrentMinute ii) Body :- $Body iii) Title :- $Title iv) SubTitle :- $SubTitle v)Play Sound :- true vi)Notification ID :- empty vii) Action Name :- empty viii) Action guid :- empty
Now run the application & test it.
After running the application successfully send the notification & wait for end of the current minute, You will get the notification.
Cancelling Scheduled Notifications:-
1.Create a new nanoflow ACT_CancelAllScheduledNotification.
2.Open your ACT_CancelAllScheduledNotification nanoflow -> Drag & Drop Cancel All Scheduled Notification activity.
3. Now go to your Home_Native page -> Take a call nanoflow button(Cancel All Scheduled Notification) & Select previously created ACT_CancelAllScheduledNotification nanoflow.
Now run the application & test it.
After running the application successfully send the notification and then click Cancel All Scheduled Notification, Wait for end of the current minute, You will not get any notification.
Cancelling a Specific Scheduled Notification :-
1.Go to your ACT_SendNotification nanoflow -> Double click on Schedule Notification activity -> Open Notificaton ID & Give the some ID value (‘testID’).
⭐⭐⭐⭐⭐ You can also perform actions with scheduled notifications. The process is the same — check out my Part-3 Actions in Native Mobile blog for details.
2. Create a new nanoflow ACT_CancelSpecificScheduledNotification.
3. Open your ACT_CancelSpecificScheduledNotification nanoflow -> Drag& Drop Cancel Scheduled Notification activity & Pass the exact notification ID here.
4. Now go to your Home_Native page -> Take a call nanoflow button(Cancel Specific Scheduled Notification) & Select previously created ACT_CancelSpecificScheduledNotification nanoflow.
Now run the application & test it.
After running the application successfully send the notification and then click Cancel Specific Scheduled Notification, Wait for end of the current minute, You will not get your specific notification.
Conclusion:
I hope this article has helped you understand How to Implement Scheduled Notification in Native Local Notifications in Mendix.
Thanks for reading this! See you in the next blog post.
Actions are the heart of app interactivity. In this part of our series, discover how to create custom actions in Mendix Native apps to empower users with intuitive and dynamic features.
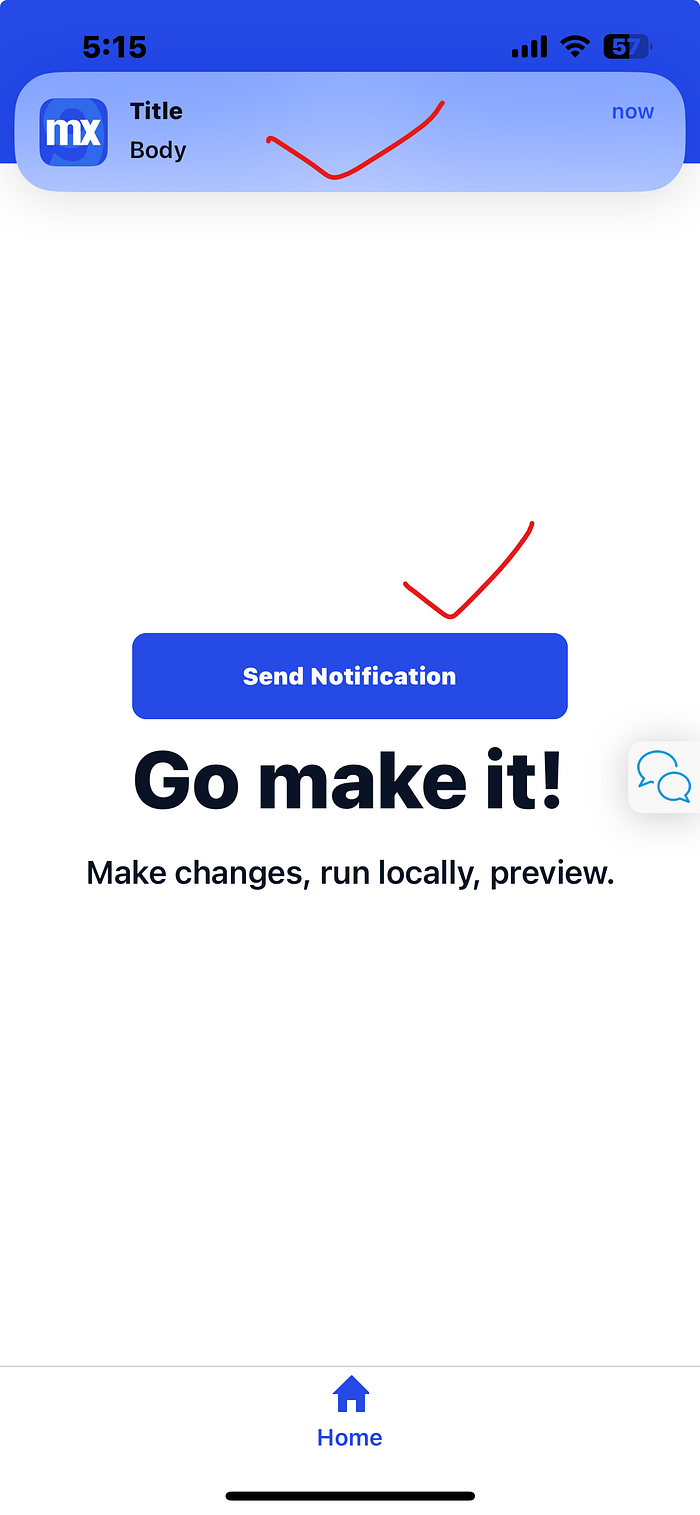
1.Go to your Home_Native page -> Drag & Drop Notifications widget
2. Double click on Notifications widget -> Click on Actions -> Create new action & give the your action name(show_page). In OnOpen select show a page & Create new blank native page (Notified_Page).
3. Open your Notified_Page & Add some static data or do what you want.
4. Go to Home_Native page again -> Open your action -> Select OnReceive & select call a nanoflow -> Create a new nanoflow(ACT_OnReceive).
5. Open your ACT_OnReceive nanoflow -> Drag & Drop Show message activity & write some message ‘Application is already open’.
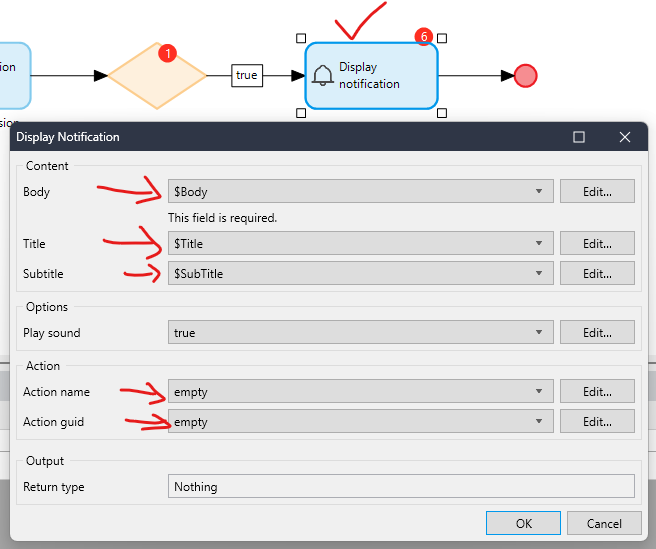
6. Go to your ACT_SendNotification nanoflow -> Double click on Display Notification activity & Give the Exact action namewhich you createdearlier(show_page).
Now run the application & test it.
After getting successfully notification just click on the notification you will be redirected on your action page (Notified_Page).
Conclusion:
I hope this article has helped you understand How to Implement Actions in Native Local Notifications in Mendix.
Thanks for reading this! See you in the next blog post.
This guide focuses on badges in Mendix Native apps — perfect for showing notifications, status updates, or counts. Learn how to design and implement them with ease
In the world of mobile apps, user engagement is key to keeping users informed and connected. One of the most effective ways to grab attention is through badges — small but powerful notifications that highlight important updates or actions.
Since you already know how to send a simple local notification
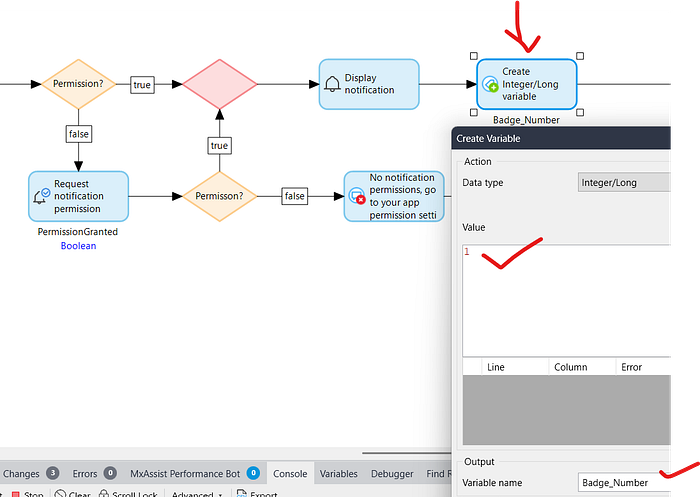
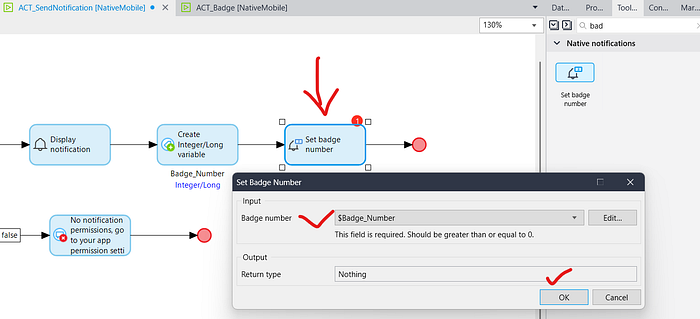
Open your ACT_SendNotification nanoflow -> Create an Integer/Longvariable after display notificationactivity -> Give the name variable Badge_Number & Assign the value 1.
After this Drag & Drop Badge Activity & Click OK.
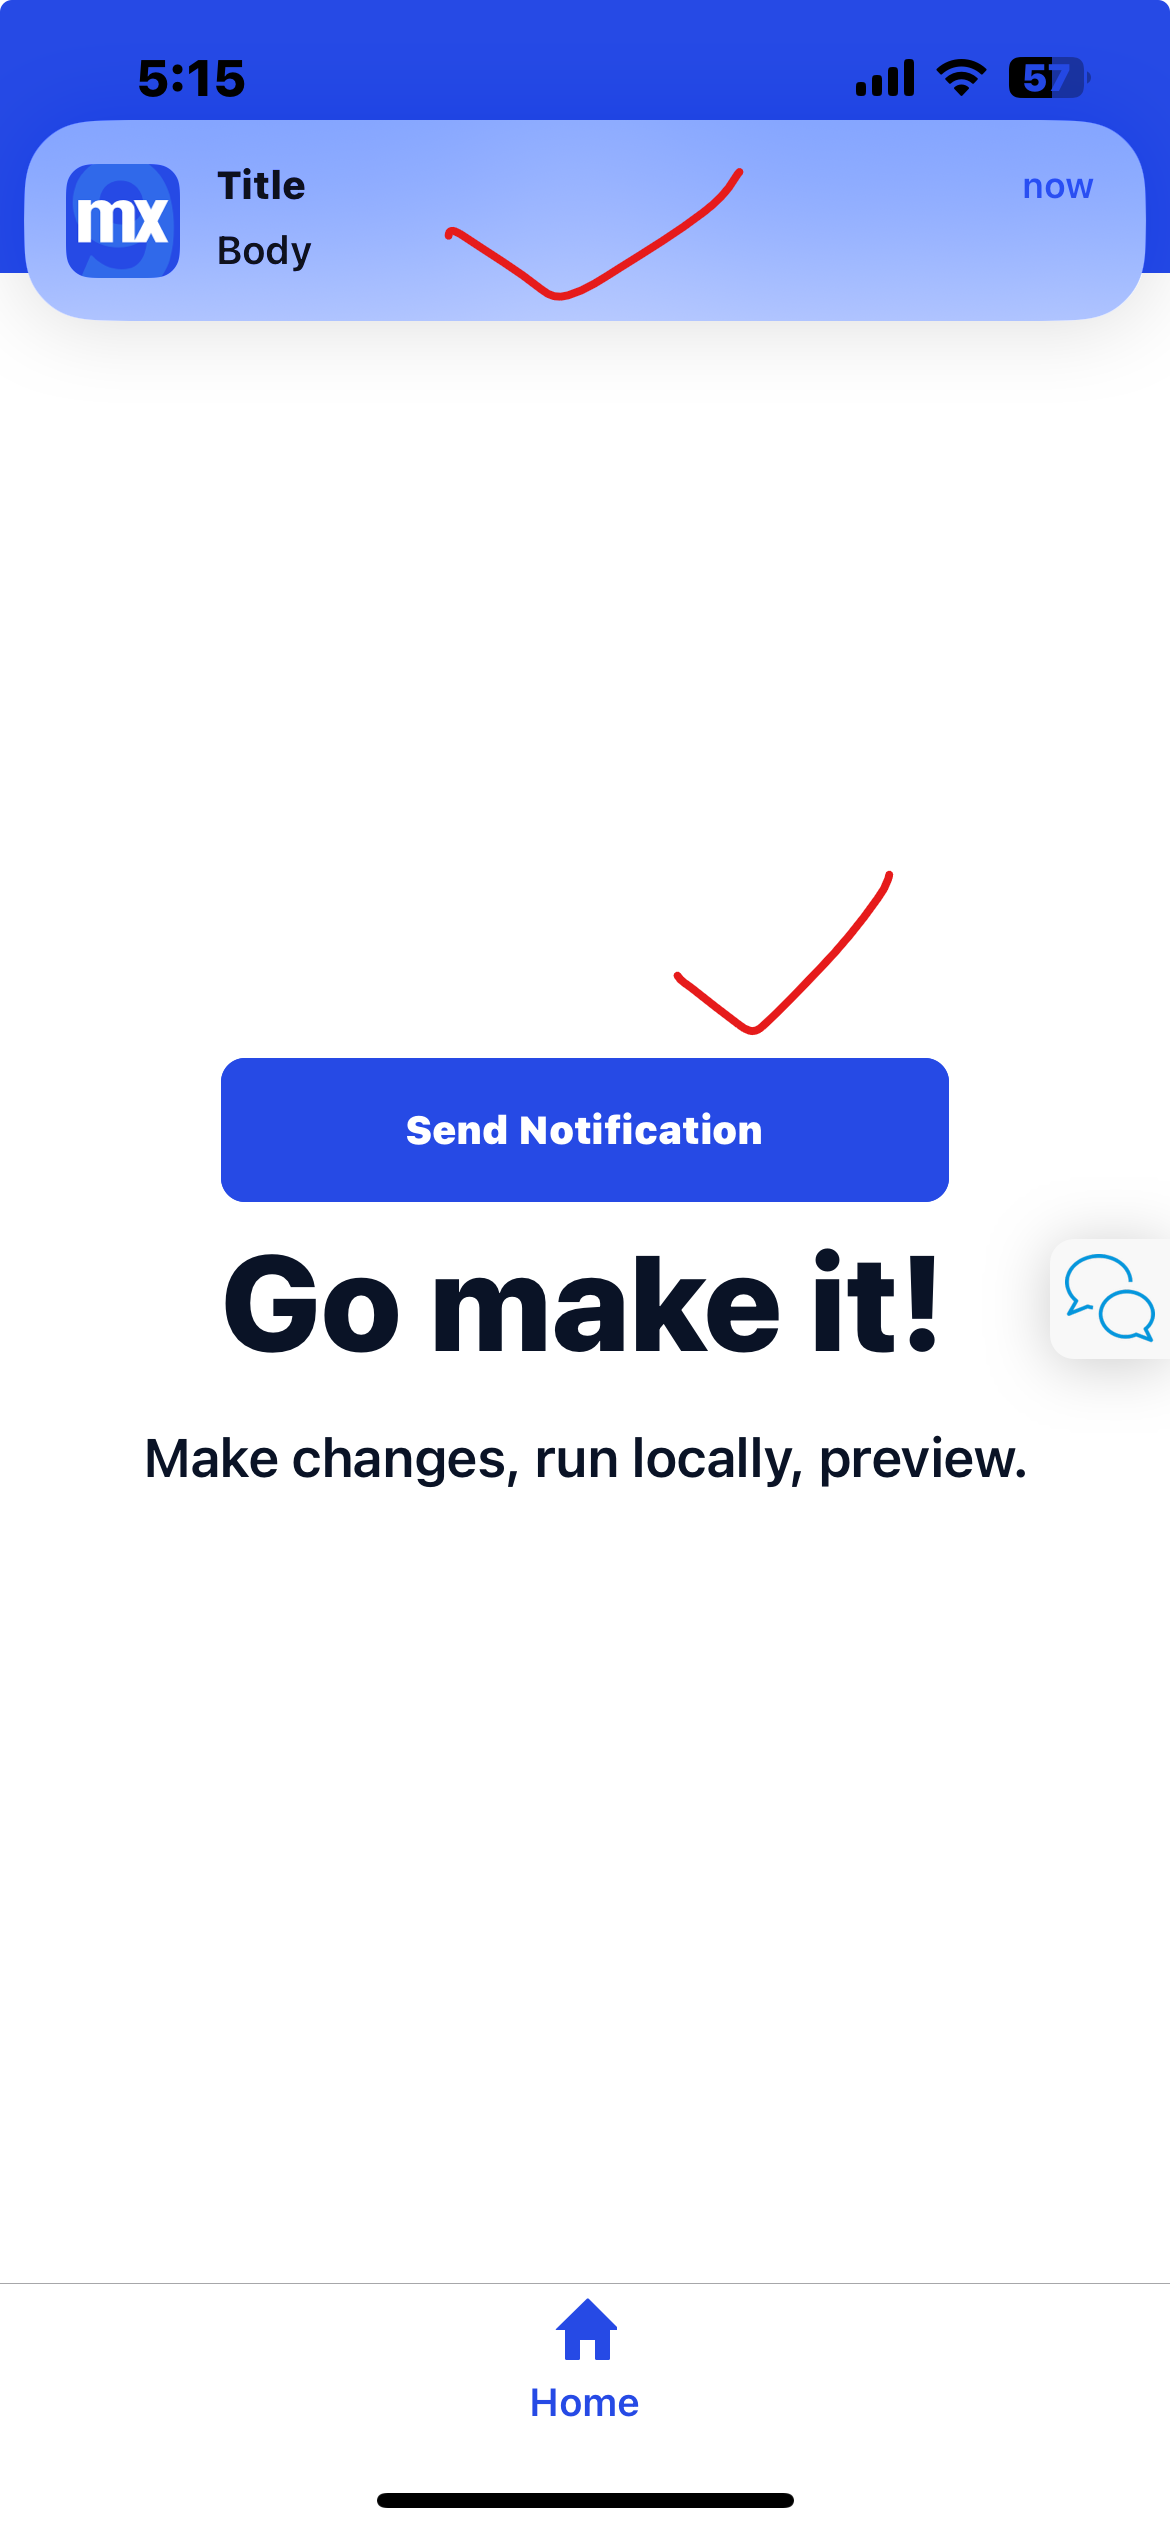
Now run the application & test it.
HOW TO CLEAR THE BADGE :-
1.Go to MX Studio Pro & Make a new nanoflowACT_ClearBadge
2. Open your ACT_ClearBadge nanoflow and Drag & Drop Clear All Delivered Notifications.
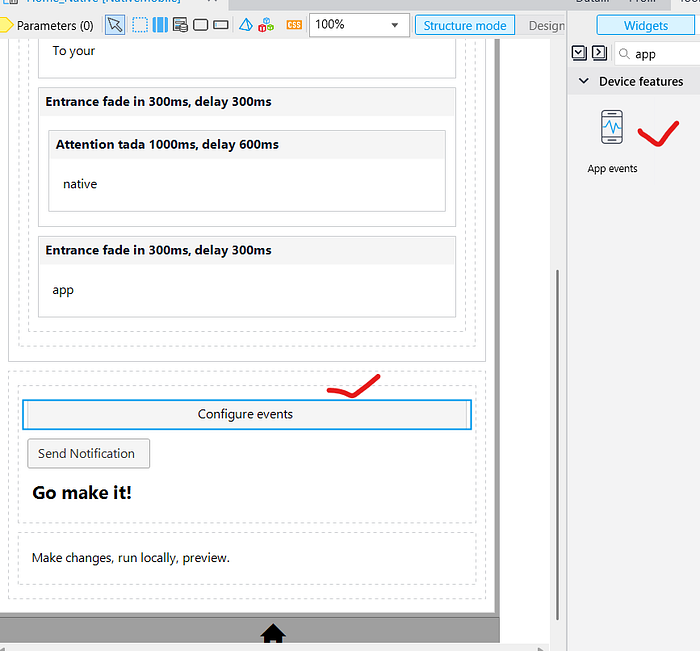
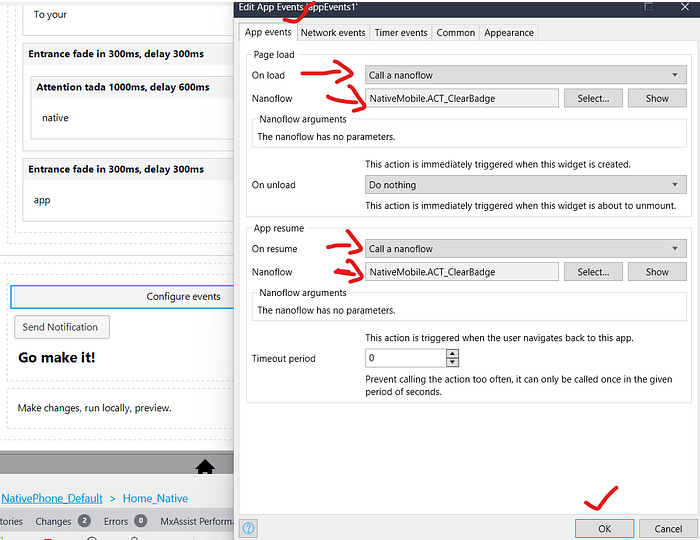
3. Now go to your Home_Native page & Drag and drop App Events.
4. Now double click on App Events -> In OnLoad & OnResume select call ananoflow & Select your ACT_ClearBadge nanoflow.
Now run the application & test it.
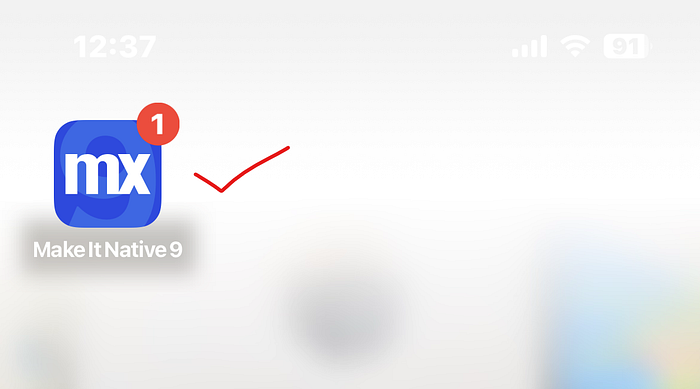
First, send the notification and then view your badge.
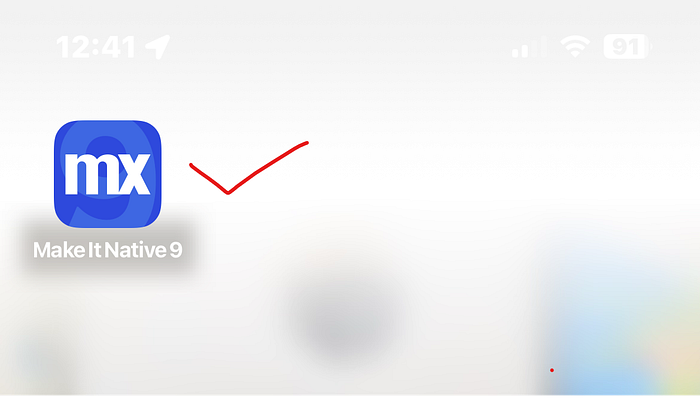
Open your Make It Native app again, go to the Home_Native page, and close the app using the middle button. Don’t close the app completely instead, resume it to keep it running in the background.
Conclusion:
I hope this article has helped you understand How to Implement Badge in Native Local Notifications in Mendix.
Thanks for reading this! See you in the next blog post.
Boost user interaction with your Mendix Native apps using local notifications. This blog walks you through the implementation process, with clear examples and tips.
This guide explains how to create local notifications for native mobile applications. Local notifications are designed to schedule and display notifications solely on the user’s device, without requiring an internet connection. A common example of local notifications is an alarm application that triggers a notification after a specified duration.
Go to your MX Studio Pro,
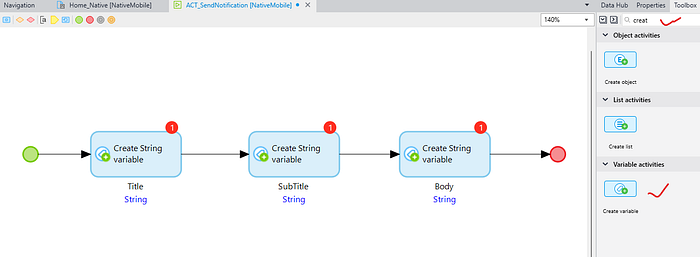
1.Open Home_Native page -> Drag & Drop a button(Send Notification) -> In the OnClick events select call a nanoflow & Create a new nanoflow(ACT_SendNotification).
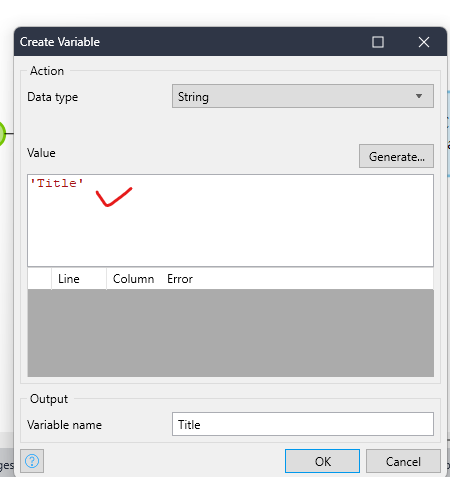
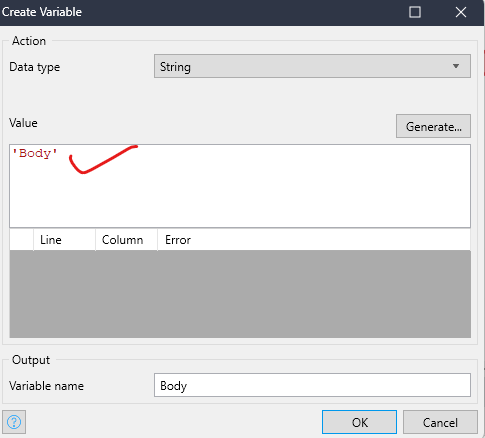
2. Open your ACT_SendNotification nanoflow & Drag 3 create variableactivity & Give the name Title, SubTitle, Body.
3. Open your 3 create activity one by one & Give some static value what you want(‘Title’, ‘SubTitle’, ‘Body’).
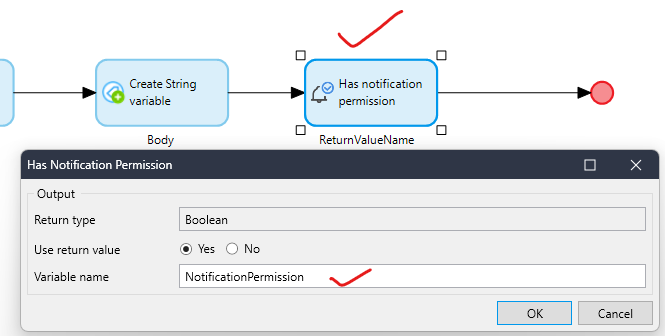
4. Drag Has notification permission & Give the variable name NotificationPermission.
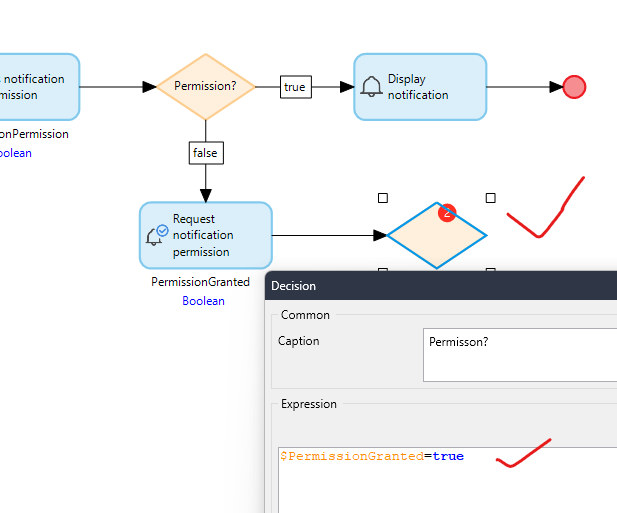
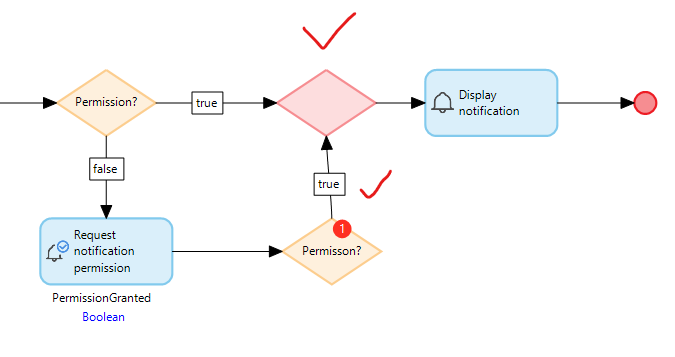
5. Drag a Decision & Check the condition $NotificationPermission=true
If condition is true -> Drag the Display Notification activity & Configure all the value.
If condition is false -> Drag the Request Notification Permission activity & Give the variable name PermissionGranted.
6. Drag another Decision & Check the condition $PermissionGranted=true
If condition is true -> Drag a mergebefore DisplayNotification & Build your connection from decision to DisplayNotification.
If Condition is false -> Drag a Show Messageactivity & write this message
‘No notification permissions, go to your app permission settings to grant permission.’ and end the flow.
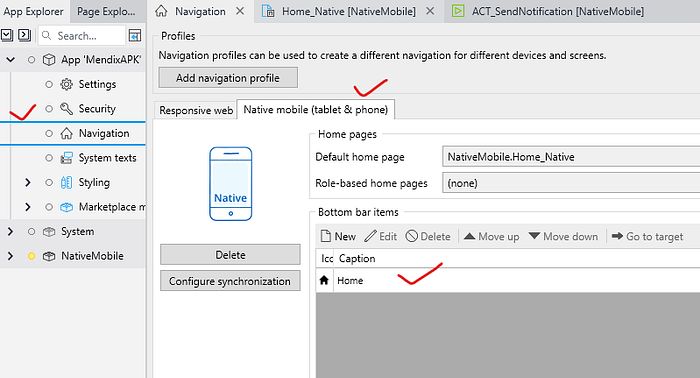
Lastly, Just make sure your Home_Native page should be added in the native navigation.
Now run the application & test it.
Conclusion:
I hope this article has helped you understand How to Implement Local Native Notifications in Mendix.
Thanks for reading this! See you in the next blog post.
This tutorial shows how to use JavaScript to implement toast notifications in Mendix Native apps. Toasts are perfect for showing success, warning, or error messages in a sleek, non-intrusive way.
Right Click on ToastNotification module -> Add Other -> JavaScript Action & give the name JS_ToastNotification.
Open JS_ToastNotification Under Settings -> General tab add one String parameter(message).
Go to the Code tab and paste the following code with the same structure.
// This file was generated by Mendix Studio Pro.
//
// WARNING: Only the following code will be retained when actions are regenerated:
// - the import list
// - the code between BEGIN USER CODE and END USER CODE
// - the code between BEGIN EXTRA CODE and END EXTRA CODE
// Other code you write will be lost the next time you deploy the project.
import "mx-global";
import { Big } from "big.js";
import { Platform, ToastAndroid,Alert } from "react-native";
// BEGIN EXTRA CODE
// END EXTRA CODE
/**
* @param {string} message
* @returns {Promise.<void>}
*/
export async function JS_ToastNotification(message) {
// BEGIN USER CODE
if(Platform.OS==='ios'){
Alert.alert("Notification", message);
}else{
ToastAndroid.showWithGravity(
message,
ToastAndroid.LONG,
ToastAndroid.BOTTOM
);
}
// END USER CODE
}
Go to Toast page -> Take a Button & give the name Show Toast By JS.
Double click on Show Toast By JS button -> In onClick events select call a nanoflow & create a new nanoflow(ACT_ShowToastByJS).
Open ACT_ShowToastByJS nanoflow
Take a JavaScript Action activity -> select previously created JS_ToastNotification & set value Message.
Now run the application & test it.
Conclusion:
I hope this article has helped you understand How to Show Toast Notification By JS In Mendix Native App.
Thanks for reading this! See you in the next blog post.
In this tutorial, you’ll learn how to display toast notifications in a Mendix Native app. Toasts are small popup messages that give quick feedback to users, such as success, error, or warning messages.
Go to MX Studio Pro Create a new module ToastNotification.
Go to the domain model & add a new NP entity(Toast) with below attributes.
i) Message
ii) IsVisible(ByDefault false)
Right Click on ToastNotification module -> Add page -> Native mobile & give the name Toast -> Inside navigation layout select NativePhone_Default(Atlas_Core).
Go to the Toast page & take a dataview -> double click on dataview select nanoflow as DataSource & create a new nanoflow(DS_Toast).
Open DS_Toast nanoflow -> take a create object activity & create Toast object & return the object.
Go to Toast page -> Take a text widget -> Select Message by {1} & set the visibility visible if true.
Take a button & give the name Show Toast.
Double click on Show Toast button -> In onClick events select call a nanoflow & create a new nanoflow(ACT_ShowToast).
Open ACT_ShowToast nanoflow
1.Take a change object activity -> select $Toast object & set its values Message & IsVisible(true).
2. Take a Wait activity & set time in milliseconds to keep the toast visible for that time.
3. Take again a change object activity -> select $Toast object & change the IsVisible to false.
4. Lastly , Go to ToastNotification Page -> double click on text & set class Toast & add following code in main.js file
export const Toast = {
container: {
position: "absolute",
top: 150,
paddingHorizontal: 25,
alignSelf: "center",
height: 45,
borderRadius: 50,
justifyContent: "center",
backgroundColor: "#00BAA3",
opacity: 0.9,
zIndex: 999999,
},
};
Go to Navigation -> Native mobile & add a new item(Toast) and select Toast page.
Now run the application & test it.
Conclusion:
I hope this article has helped you understand How to Show Toast Notification In Mendix Native App.
Thanks for reading this! See you in the next blog post.
In this article, you’ll learn how to send WhatsApp messages from a Mendix Native app using JavaScript. We will open the WhatsApp application directly from the app and send a real-time message to a specified phone number with a single tap.
Right Click on JavaScript module -> Add Other -> JavaScript action -> give the name JS_Whatsapp.
Open JS_Whatsapp JavaScript action
Go to Settings -> Under the General tab add two string parameters,
first(number) and second(message).
Go to the code section and add the below code to import the Linking.
import { Linking } from "react-native";
Now remove this code code
throw new Error("JavaScript action was not implemented");
And add the below code between Begin & End user code.